Wednesday, October 28, 2009

Merry Christmas to me

It was a bargain that I couldn't pass up. I first decided not to buy it. Then I went to Cedar Lakes and spent three days using one just like it and fell in love with the power and sturdiness of this lathe. The final straw was my wife's suggestion that this could be my Christmas present from her. So, I recontacted the seller and negotiated a mutually agreeable price. We disassembled it, loaded it in my Explorer, drove it to my workshop, and reassembled it. Here I am standing next to 440 pounds of cast iron that Mary Lou and I moved from my car into my shop.


This is my new baby: a Jet #708359 JWL-1642EVS 16-Inch Swing 42-Inch between Centers 1-1/2 Horsepower Electronic Variable Speed Woodworking Lathe. I bought it from a small business that purchased it to make trophy bats and then discovered they could buy preturned blanks and reduce their costs. It was only used slightly and appears almost brand new. There are a couple of accessories that should have come with the lathe but did not. I will order those this coming week. The overall cost savings on the lathe is about 35%.


Along with the lathe I bought the Vega duplicator that the seller had also purchased to make the trophy bats. It is used to follow a template or another turning to duplicate turnings. Here again I initially was not interested in the duplicator. Again, my wife intervened to suggest that I would probably regret not getting it. So, that came along as well. The duplicator is already set up to work with the Jet lathe that I bought. Although I don't intend to make trophy bats with it, making spindles, chair legs and Windsor chair spindles did come to mind. This cost me about 50% of the retail price listed on Amazon.

Finally, the listing for the lathe sale indicated that a tool set was included. It is a Steelex 6-Piece Deluxe HSS Lathe Chisel Set. I have never heard of the brand but I did see some listing on Amazon for the set and several other Steelex products. This particular item did not have any reviews but another Steelex chisel set was really downgraded as poor in quality. I don't need any of these tools but will at least give them a tryout. This set lists for just over $100 which would be about the cost for one good chisel so I know not to expect too much.
I really don't want to end on any kind of negative comment. The lathe was a beautiful gift from my wife and a fantastic tool to help me improve my wooturning skills. This was a fantastic deal all told! Merry Christmas just a few weeks early.


Wednesday, October 14, 2009

Cedar Lakes 10-14-09

My projects:


My first project was a walnut bowl turned from a 6x6x4 inch piece of wood. I had seen a video on YouTube in which the turner embellished the outside of the bowl with several lines - two burned into the wood and one in which a copper wire was glued and then turned to follow the flow of the bowl. The video can be seen as this link.
I have tried this embellishment a couple of times. Cutting the groove into the wood using a skew chisel gives the correct depth and width for the groove. This then determines if the wire will be far enough into the bowl to seat properly and not reveal too much of the CA glue used to adhere the wire to the wood. The other precise action is to cut the wire so that the wire appears to be a seamless.

Also that first day I made a paperweight. I had wanted to give something to the Coordinator at Cedar Lakes who allowed me to spend my week in their turning studio. I got the idea for a paperweight that included the state quarter embedded into a turning done in the wood of the state tree. In this case, the 2005 West Virginia quarter embedded in a turning of sugar maple.
I based my turning on a Fall, 2005 article in the American Woodworker magazine written by Nick Cook. The top of the piece holds the back side of the state quarter. Inside the piece of wood is a hollowed place for three 2 inch washers which add weight to the piece. I altered his suggested procedures only in relation to the bottom piece which conceals the washers. Where he suggests using a piece of plywood, I turned and parted off a 1/4" x 2-3/8" section of the maple, then drilled the 2-1/8" hole for the washers, and finally, enlarged the first 1/4" of the opening to accommodate the insert. In that way, the bottom of the piece can match the grain and color of the rest of the paperweight.


My final project for the first day was to create a mallet. Again, I used a YouTube video for ideas on creating the mallet. I used a 3" x 3" x 10" maple blank. The mallet is essentially tailored to fit the user's hand but it is roughly half the length for handle and the remainder for the mallet head. There are beads at each end of the handle and the handle is slightly convex. Again the thicknesses are really determined by the user's comfort. The head is beveled at both ends to eliminate sharp edges and the end of the head is coved so that is easily stands on end. This was a practice piece to try and become more comfortable using a skew. I did quite a bit of this project with that tool. It took a lot longer but the experience was valuable.
There are a series of five YouTube videos by Bob Hamilton that show this project in great detail. The first of the five is at this link.


Bob Hamilton also inspired my Tuesday and Wednesday project, a Christmas ornament. He has nine YouTube videos and several pictorial articles showing the steps to create the ornament body, interior decoration, top finial, and bottom finial. His updates correct some tolerances for the ornament body and offer some easier methods.
The woods I chose were paduak for the ornament body and maple for the decoration and finials. It was a challenging project for me in several ways. First, there is a lot of "turning air" since you round the ornament body after the holes are drilled in the sides. The illusion is that you can see through the interior of the spinning ornament. You have to look at the "shadow" of the outline in order to see where you are cutting. It was also challenging for me to turn such small pieces for the finials. The whole ornament is about five inches long and the bottom finial is half of that length. That bottom finial is less than 3/8 inch at its widest.
Each of these projects are finished with sanding sealer and friction polish except for the mallet which will mellow naturally with use.


My final project for Wednesday was to turn a large walnut platter. It is turned from a 10" round blank of claro walnut. The wood is just beautiful - a gradation from the gray-brown of the sapwood to the dark brown of the heartwood. I like this particular bowl since it has thin arching sides with a large supporting bottom ring.
My challenges here were to turn the thin sides with consistent thickness and to produce a relatively flat bottom.
I finished this platter with sealer, polish, and Bri-Wax. I will need to complete the bottom of the platter at home when I can use my vacuum chuck.


Tomorrow is another day of turning and I have not yet decided what I want to do. I have more of each of the preceding projects that I could repeat. I also brought pen making supplies, pepper grinder kits, and tea light blanks that I could do. I certainly won't run out of supplies before I run out of time tomorrow. I will need to clean the wood shop and pack up all my supplies since we will be leaving Friday morning to return home. This has been a real gift.

Monday, October 12, 2009

Cedar Lakes - a turning class of one

Mary Lou and I are at Cedar Lakes Conference Center in Ripley, WV, for Zapora's Quilting Conference. There are several hundred women here from all over the United States (although half of them are from Ohio). They are all in four days of classes which are scattered in every nook and cranny around this campus.

Well, every nook and cranny except for the wood room in the Craft House. That is full of wood working machinery including several wood lathes. The Coordinator of the Craft Center Services graciously allowed me to bring my wood turning tools and supplies along with two boxes of wood blanks and entertain myself during the day while Mary Lou and the other quilters did their thing.

Each morning and afternoon I am going to the wood room and having the greatest time. My first day I turned a walnut bowl with inlaid copper wire accent, a maple mallet which I promptly began using in my turning, and a maple honey dipper.

I am using a Jet lathe which is much heavier and more powerful than the Delta lathe I have at home. It is a real treat. The entire body of this lathe is cast iron, the motor is 1 1/2 horse power, and it has the capacity to turn a 14" round vessel. None of the projects I brought will tax this lathe.

Here is a short video showing some of Cedar Lakes:
http://www.youtube.com/watch?v=Eg0hK-7sGdE

Saturday, September 19, 2009

Lidded box demo by Cindy Drozda


Buckeye Woodworkers and Wood Turners hosted Cindy Drozda to demonstrate her speciality - turning miniature lidded boxes with intricate finials. She spent the morning and early afternoon turning a miniature lidded box made from holly with bloodwood accents. Over 70 of the club members attended the all-day demonstration. She will return over the next two days to hold hands-0n classes with individuals club members.
The agenda for the all-day class also included demonstrations on laser guided hollowing systems and explanations of the negative rake tools she uses. She ended the day discussing sharpening and finishing suggestions.
I have seen a number of videos and magazine articles about miniature boxes but have never seen one actually made. It is amazing the amount of intricate work involved to create the individual pieces (finial, lid, accent inset, body and foot). To me the most telling picture I took is the picture of the miniature she produced next to a standard size coffee cup. Amazing!
Here is a sampling of pictures from that demonstration:
Droza Demo

Monday, September 7, 2009

The "Campbellin"

We just returned from another special experience at the John C Campbell Folk School in Brasstown, North Carolina. It is situated in a quiet valley in the midst of the Appalachian mountains with few modern distractions: full of learning challenges and chances to meet new and interesting people. It is like no place that I have ever been and we are already thinking of when to return.
For me, the experience was a chance to build a unique musical instrument and begin to learn to play it. John Huron of Noteworthy Music in Bristol, Tennessee, was the instructor and also the developer of this instrument. Because of it's design, the Campbellin could be built and then played within the week of the class. So Sunday through Wednesday was spent in the wood shop building the instrument. Thursday we "spanked the baby" by stringing the instrument and hearing it's first sounds. By Friday, the class was playing "Ode to Joy" at the concluding exhibit.
With the instructor's guidance and development of jigs and fixtures it was relatively easy to build and finish the Campbellin. I chose walnut sapwood for the top, walnut for the bottom and fretboard, ash for the sides, and sassafras for the neck. It was finished with one coat of urethane oil.
Learning to play the instrument was the most challenging part of the week for me since I lacked any knowledge of music theory. The idea, of course, is to follow the tradition of folk music and to experiment with the instrument. Most folk instruments were made and played by people who simply made up their own songs or "figured out" how to follow a folk melody. So, I have a new hobby - sitting on the deck and learning to play an instrument that I built. What a beautiful addition to my life.
I am editing a lot of video from this week and will be posting it to You Tube in the next couple of days. I will add a link to the blog when it is uploaded.


Tuesday, August 25, 2009

Video of Sharpening Station

I have now become a videographer. We purchased a digital video camera and I am learning everything at once: how to operate the camera, how to take decent videos, how to transfer them to the computer and use software to produce a movie, and how to upload that movie to the Internet.
Needless to say I am on a long learning curve. My first attempt was terrible for many reasons and I will be taking it off you tube.
My second attempt, out of the need to create an insurance video of the contents of my work shop, was a lot better thanks to some advice from my son on how to get a better quality picture.
So, you can play the video to get a lot more information than you could possibly want about a sharpening station that I have close to complete. Get you popcorn and watch!

http://www.youtube.com/watch?v=Sg4i4UhSDQM

Friday, August 21, 2009

Woodturning can be contagious


We had a family reunion and my brother, Ron, and his family from Texas were able to spend a week with us. He helped me get the garage cleaned up in preparation for the reunion and we had a day and a half together to play in the wood shop.
Ron has been a wood worker for a lot of years and has done some spindle turning for a crib that he made for his grandsons and granddaughter. He hadn't turned any bowls so we set him up with a couple blanks to start practicing.
He is a fast learner and his skills quickly developed. There is a distinctive sound when you "get a catch" and usually a noticeable gouge in the wood when you turn off the lathe. He had to experience the catches in order to learn to control the gouge. He uttered some "Ooops" sounds but he did improve quickly.
Ron made several "treasures" that documented his first attempts.
Then he quickly began to make some really fine work. He finished the second day with a maple bowl for his daughter. I think he also left with the hopes of doing some more turning in his Texas shop.
Usually you try not to share a contagion with anyone, but this time it was really enjoyable to pass this on to my brother.
The reunion was fun and seemed to go smoothly. One of my favorite memories of that reunion will be the time Ron and I spent together in the shop just enjoying each other and playing with wood.

Tuesday, August 18, 2009

Almost but not quite


I listed this saw for sale on Craig's List. A guy named Gus called me and wanted to buy the saw. We dickered on price, agreed, and then set today at 10:00 AM for him to show up with the cash and pick up the saw.
Guess who didn't show and didn't call! I would have appeciated a call since it would have saved me a few hours waiting around.
So, I still have the saw listed and will hope that someone else responds. I'll probably be a little less trusting with that someone because of this experience.
Anyone want a radial arm saw? This is the ad content:
"Sears Craftsman Model # 113.197150 10-in Radial Arm Saw and Stand. Has Radial Guard Retrofit Kit #RPL 29012 which includes new safety shield for the blade and a new table top (both still in the box). Also includes Freud 10-in combination blade, shaper head with two molding head bit sets, 7-in dado blade set. Saw is wired for 110V. It does run but I have never used it. Located at Lake Buckhorn. Purchaser to disassemble and move."

Monday, August 17, 2009

Woodturning Exhibition


The Northcoast and Buckeye Woodturners sponsored a competition and exhibit at Wayne Center for the Arts in Wooster, Ohio. The exhibit runs from July 9 through August 28, 2009. Here are some pictures from that exhibit. The work is stunning.

Buckeye Wood Turners

I travelled up to Clinton, Ohio to Camp Y-Noah on Saturday to attend my first meeting of the Buckeye Wood Workers and Woodturners. The group meets on the third Saturday of each month and combines a short business meeting with a demonstration by group members or visiting demonstrators. They have a show table of members' turning work and photograph each piece for display on their "Gallery" section of their web site.
This month's demonstration was about pen turning by club member, Bob Taylor. His presentation was full of information and technique suggestions. Most interesting to me was his use of some unusual materials - corn cobs, shredded currency, and denim fabric - to make blanks for pens. I learned a lot about using CA glue in finishing a pen blank as well as micromesh for wet sanding acrylics.
Since wood turning is most often a solo hobby, it was nice to be with a group who enjoys the same activity and willingly shares a lot of information with each other.
Following the morning meeting there is often a hands-on activity for members to try out skills. The club has a large Powermatic lathe and many Jet min-lathes for these meetings. It really impressed me as a group seriously devoted to wood turning.
I am looking forward to returning next month when an internationally known turner, Cindy Drozda, will be presenting a members-only demonstration. (If you want to see some beautiful turnings, follow that last link)

Tuesday, June 30, 2009

An excellent recipe for cleaning brass

I bought a bunch of old post office lock box doors from a vendor in South Carolina and from an offer on eBay. They arrived in the same condition they were in when they were taken out of a post office being remodeled - dusty, dirty, and very tarnished. Along with the doors the South Carolina vendor sent a recipe for cleaning the brass - one portion of Coke to an equal portion of ammonia! I figured that this had to produce some kind of acidic liquid and took precautions: do the work outside, wear gloves, and prepare for really obnoxious fumes.
Well, most of my precautions were unnecessary. I could use my bare hands without any irritation and the fumes were certainly tolerable since I was outside. The impact on the brass was amazing. Although the directions said to let the doors soak for some time and to use a brass brush to clean the decorations, the brass brightened almost instantly and I used the brass brush sparingly. Dipping the doors in water after the Coke/ammonia soak produced an attractive door ready for my project. I applied a coat of spray lacquer as a finish.
I brought the recipe ingredients home to try on some brass house numbers that were so tarnished they were as brown as the painted wood post they were on. They took a little more scrubbing to get the brass to shine but the recipe worked much better than previous attempts.
I will be building some banks that use the post office box doors as a front door into the contents. I have also found a project to make large replicas of a post office truck where the post office box door is the back door of the truck. Right now I am gathering the cherry, walnut, and rosewood for those projects. More of this as the work starts.

Saturday, May 30, 2009

Finally finished the cherry cabinet

I am finally finished with a project that I started several years ago. The cabinet is cherry with veneered plywood for the top, sides, and back. It has two dovetailed drawers with cherry drawer fronts. I have procrastinated in finishing this project. First, it was the finish - what to do to get the nicest finish. I finally ended up using a wipe-on polyurethane. It seems to be a nice choice for this piece. Overall I am really pleased with the outcome.

But the main reason that I have procrastinated for months is the poor workmanship on the top. Unfortunately, I planed through the cherry veneer to expose the very ugly plywood layers (try yellow) under the veneer. So there are, not one, but several places on the most viewed surface of the cabinet that look damaged.

I learned a lot with this project. I made my first dovetailed drawers. I used poplar for the drawer frames. This was my first experience planing and fitting the drawers into the cabinet frame. It now resides in my office at Wooster.

In addition to the fitting of the cabinet. I was able to complete a small project to make two letter openers - one from cocobola and one from acrylic. These kits were from Berea Hardwoods so I needed to purchase a drill bit and a bushing set in order to turn the blanks. The construction is simple but there may be an error in the instructions. There is a center band that has a recess on one end that is supposed to fit over a stub of the 1/16" of exposed brass tubing. The picture of the letter opener in the instructions suggests that the center band is reversed. So, I am not sure that my rendering matches the intended assembly. At least they seem to work.

I decided that I wanted to make a number of bowls - some to use up some ambrosia maple bowl blanks and several others to make a set of walnut salad bowls. I wanted to do these on a production line - first turn all the outsides, then turn the insides, and finally, apply the finish all at the same time.

With the time that I had I was able to finish the outsides of one of the ambrosia bowls and three of the salad bowls. When I return to the workshop next weekend, I would like to finish turning the inside and outside of those five bowls. I am able to easily use my sharpening station to keep the gouges nice and sharp.
So, I completed two and a half projects this weekend. A fun two days in the shop.


Thursday, May 14, 2009

Epoxy inlaid gift boxes

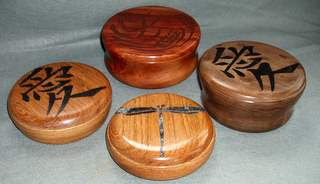
This project came from the December, 2005 issue of Workbench magazine. It starts with separating a 3/4 inch lid blank from a 3" x 6" x6" turning blank. A decorative symbol or drawing (the article includes three: dragonfly, wheat, and love symbol) is adhered to the lid blank. The lid blank is scroll-sawn and then filled with colored epoxy. The lid and body pieces are then glued to waste blocks.
Using a faceplate the lid is turned to round and the design paper and excess epoxy are turned off the top face of the lid. The lid is finished and then parted off. The body is likewise rounded, hollowed out to match the lid, and parted from the waste block. I used black epoxy for the walnut and jatoba bowls and beige for the burl bowl.
I followed the process as outlined in the article and ended up with four small, attractive and interesting lidded boxes. I used a bowl gouge for most of the turning as opposed to the article's use of scrapers. I had some difficulty with a cloudy epoxy finish which took extensive polishing to remove. I used a sanding sealer and then polished the boxes using the Beall system.
I would like to try the project again using some different designs and unique woods. I would also try a different method for mounting the wood so that I can get a better appearance and form to the lid and box bottoms.

Thursday, April 30, 2009

"Firewood to Fine Art" at John Campbell Folk School

This was my second class at John Campbell. I returned to the wood turning studio and joined seven other students for a class taught by Bobbie Clemons of Tennessee (pictured at the left) and Charles Watson of South Carolina.
The instructor from my first wood turning class at John Campbell had recommended this class since it emphasized both bowl and green wood turning.

We started our week on dry wood bowls using a chuck with a screw to hold 2" thick 10" maple turning stock. Immediately I started learning some "tricks of the trade" that solved some problems I had been experiencing in my turning. I learned to use a plastic bushing between the headstock spindle and the chuck to make it easier to remove the chuck. I also saw the value of using beeswax or parafin on the screw to help load the stock onto the screw chuck.

The turning steps we used were:
Mount the stock and turn the outside of the bowl.
Finish bottom with dove-tailed tenon
Finish sand and apply finish to the bottom. Remove screw from chuck and insert bowl blank foot into chuck.
Complete rim of bowl
Turn inside of bowl
Finish sanding and apply finish to the inside
Reset bowl between jam chuck and tail stock to finish the foot
Refine bowl foot chisel or Dremel off small nub

I completed two shallow maple bowls and had a third blow up due to a crack (see picture above left). When I returned home I band sawed off the broken rim and turned a small holder for my wife to display some of her larger decorated eggs.


The third and remaining days we spent on green wood and natural edged bowls. We used greenwood blanks that Charles cut for our use.
We turned the inside of the bowl leaving a thickness of 1 inch for each 10 inches for the bowls that would be dried and returned in a few months. We completely turned other practice pieces to a 1/4" thickness. In real circumstances we would have wrapped the thick blanks in newspaper or a paper bag for a couple of days
and then store for 3+ months in cool place out of sun and drafts. Once the blank had dried and warped sufficiently, we would then be able to return both inside and outside to final thickness and form.

We completed the week doing several natural edged bowls. We used a two prong drive spur on the lathe and used a 1 1/2" Forstner bit to remove the bark area where the drive spur would enter the wood. The turning processes were essentially the same as the green wood.

On Friday we displayed some of the pieces we had finished during the week. I had several natural edged bowls that were displayed. We treated the unfinished wood with lemon juice to remove some of the staining.
I brought home several extra green wood blanks to rough turn and save for returning this fall.
This was another excellent class. We have so much enjoyed the experience and the chance to learn at John Campbell. We are already planning a return in the fall. I am enrolling in a class to make a "Campbellin" - a style of mountain dulcimer.


Monday, February 16, 2009

A sneak preview

I spent several days at the lake wood shop working on a variety of projects. I turned several more bottle stoppers and packed up the remaining pieces and parts for another time. I used several of the yellow plastic stopper kits and used them as stoppers for vinegar/oil bottles.

I also worked on rough cutting the pieces for the post office box trucks. Poplar for the test pieces and cherry and walnut for the final products. I have to clean many of the post office box doors and I am sure there are several sizes, so I will clean and apply a finish to the doors before I start the final cut to size for the wood.
Finally, I couldn't wait any longer to use the sharpening station. So, I installed the casters and attached the top so that I could mount the grinder and sharpen a couple gouges. I'll have to disassemble the top so that I can install the case back and interior divider. It will be nice to have a permanent set up for the grinder.


Thursday, February 5, 2009

Woodturning at John Campbell Folk Art School

My wife and I ventured to Brasstown, North Carolina, for a week at John Campbell Folk Art School. Situated in the far southwestern corner of North Carolina and nestled in the Appalachian Mountains, the school offers hundreds of classes in over fifty different crafts - art, fabric arts, music, dance, cooking, gardening, nature studies, photography, wood carving, wood turning, and writing. For Mary Lou it was quilting with a nationally known instructor. For me, what else, it was wood turning.
The school is an example of non-competitive learning with simple living arrangements, excellent food, and time to learn and relax.

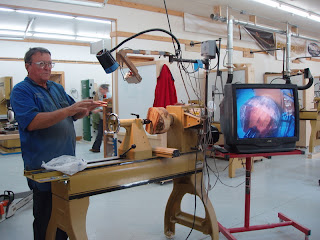
My wood turning class was held in what can only be described as the perfect set-up for wood turning. The Willard Baxter Wood Turning Studio is said to be the nation's largest wood turning school offering over 50 classes per year. A 2 year old building equipped with full size Powermatic lathes, Jet mini-lathes, quality tools, and ten roomy work stations. The lighting was excellent and a newly installed central dust collection system made it a comfortable setting. The instructor's lathe had a video camera and television set to enable the students to watch each demonstration. Everything you needed for helping me learn more.
To top off the learning experience, our instructor, Troy Bledsoe from Social Circle, Georgia was an experienced turner with a gift for making the class productive and fun. The projects were candlestick, tea lights, "confetti" lights, bowls, and bottle stoppers. Each project was helpful in learning to properly use and control my gouges. I also spent part of the last day practicing sharpening my own tools with a lot of guidance from the instructor. Now I am able to transfer those grinds to my own sharpening system and hopefully maintain the sharpness I like.
This has to have been the single best class I have ever attended. It is the reason that I am intending to return to the school in April for another turning class.

Monday, January 19, 2009

Mahogany and Birds eye Maple box

I finally got around to putting the finish on the lidded box I started in a Woodcraft class and wrote about back in October [link]. I just didn't like the combination of mahogany with a walnut veneer top, so I built a new lid with a bird's eye maple top. The finished project is a combination of mahogany sides, veneered maple top, veneered mahogany/walnut bottom, and walnut dividers.
The mahogany/maple combination has turned out to be more attractive to me so I am glad I remade the top. I used a wipe on poly for the finish and installed two small hinges. I will probably add a small brass knob to the lid.

Friday, January 2, 2009

Sharpening Station starts to take shape

I saw a sharpening station in Issue 81 of Shop Notes that I thought came close to fitting my needs. I was looking for a place to house my grinder and Wolverine Sharpening system for my lathe tools. The station in the Shop Notes had everything I wanted but it had an expandable top with a built-in water basin for water stones. I was more interested in having a permanent site for my 8 inch slow speed grinder and also a place for sharpening with sandpaper and stones. I didn't think I wanted to have to move the grinder in order to access the water basin.
I did remember seeing a grinder mounted on T-track that slid to the back of the station when not in use. I think that approach gives me the multiple sharpening situations that I think I will encounter.
So this drawing indicates the physical structure and layout of the cabinet I am building. There are several changes from the Shop Notes station. I am putting it on casters so I can move it to the lathe or workbench depending on what type of sharpening I want to do. I made the top solid double layer of 3/4" MDF with melamine and hardwood edging. Two T-tracks are embedded in the top to allow the grinder platform to slide from the back to the front. The grinder itself is on a platform to accommodate the height necessary for the Wolverine sharpening jigs. I am adding a movable work light to help with fine honing.
I'll start adding pictures of my actual work station as it takes shape over the next weeks. Right now I have the cabinet shell and face frame assembled and I have the top completed and ready to attach.

Thursday, January 1, 2009

2008 Projects become 2009 Ideas

Last year at this time I created a notebook that had all of the wood working projects that I wanted to do in 2008. And I even made a resolution, "I will complete all of my wood working projects.
Well, life intervened and I was redirected to different activities for a large part of the year. And I also discovered that I was picking up new project ideas and working on them instead of the projects on my list.
So, this year my resolution is much more general - to enjoy working on projects in my shop. And it gets more to the heart of why I spend time in the shop without setting number goals.
Aside from the old resolution, I had a good time learning this year. I spent a lot more time wood turning and completed a number of projects on the lathe. So maybe by concentrating on enjoying the projects instead of just how many I completed, I will make room for more learning and for new discoveries.