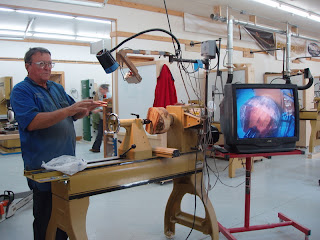
 This was my second class at John Campbell. I returned to the wood turning studio and joined seven other students for a class taught by Bobbie Clemons of Tennessee (pictured at the left) and Charles Watson of South Carolina.
The instructor from my first wood turning class at John Campbell had recommended this class since it emphasized both bowl and green wood turning.
We started our week on dry wood bowls using a chuck with a screw to hold 2" thick 10" maple turning stock. Immediately I started learning some "tricks of the trade" that solved some problems I had been experiencing in my turning. I learned to use a plastic bushing between the headstock spindle and the chuck to make it easier to remove the chuck. I also saw the value of using beeswax or parafin on the screw to help load the stock onto the screw chuck.
The turning steps we used were:
Mount the stock and turn the outside of the bowl.
Finish bottom with dove-tailed tenon
Finish sand and apply finish to the bottom. Remove screw from chuck and insert bowl blank foot into chuck.
Finish sand and apply finish to the bottom. Remove screw from chuck and insert bowl blank foot into chuck.
Complete rim of bowl
Turn inside of bowl
Finish sanding and apply finish to the inside
Reset bowl between jam chuck and tail stock to finish the foot
Refine bowl foot chisel or Dremel off small nub
I completed two shallow maple bowls and had a third blow up due to a crack (see picture above left). When I returned home I band sawed off the broken rim and turned a small holder for my wife to display some of her larger decorated eggs.
The third and remaining days we spent on green wood and natural edged bowls. We used greenwood blanks that Charles cut for our use.
We turned the inside of the bowl leaving a thickness of 1 inch for each 10 inches for the bowls that would be dried and returned in a few months. We completely turned other practice pieces to a 1/4" thickness. In real circumstances we would have wrapped the thick blanks in newspaper or a paper bag for a couple of days
and then store for 3+ months in cool place out of sun and drafts. Once the blank had dried and warped sufficiently, we would then be able to return both inside and outside to final thickness and form.
We completed the week doing several natural edged bowls. We used a two prong drive spur on the lathe and used a 1 1/2" Forstner bit to remove the bark area where the drive spur would enter the wood. The turning processes were essentially the same as the green wood.
On Friday we displayed some of the pieces we had finished during the week. I had several natural edged bowls that were displayed. We treated the unfinished wood with lemon juice to remove some of the staining.
I brought home several extra green wood blanks to rough turn and save for returning this fall.
This was another excellent class. We have so much enjoyed the experience and the chance to learn at John Campbell. We are already planning a return in the fall. I am enrolling in a class to make a "Campbellin" - a style of mountain dulcimer.


No comments:
Post a Comment